Maven生命周期(二)
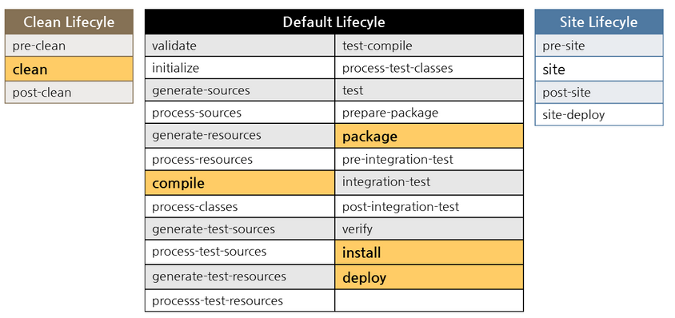
Maven引入了生命周期模型,对项目的整个构建过程进行了抽象和统一。Maven定义了三种类型的生命周期分别用于完成不同的工作,分别是default、clean、site,每种生命周期都是由不同的一系列过程阶段组成。
生命周期类型
- clean生命周期
该生命周期主要用于清理项目相关资源文件,它包含了如下阶段:pre-clean:执行一些clean前需要完成的工作clean:清理上一次构建生成的相关文件post-clean:执行一些clean后的需要完成的工作 当运行命令mvn clean时,执行的就是clean生命周期中的clean阶段。
- site生命周期
该生命周期主要用于生成项目文档以及构建项目web站点,当前很少用到,后续有需要可自行学习。 - default生命周期
该生命中周期主要用于项目的构建部署,是maven最重要的核心生命周期,该生命周期包含的阶段非常多,下面介绍常用的几个生命中后期阶段。validate:验证项目是否正确,必要的资源信息是否有效compile:编译项目中的源代码文件test:使用合适的单元测试框架测试已编译好的测试代码,这些测试代码文件不会被打包和部署package:把已编译的代码打包成可发布的格式,如jarinstall:将打好的包安装到maven本地仓库,然后可以在作为其他项目的依赖进行引用deploy:将包发布到远程仓库,供其它开发者或项目共享
Maven生命周期中的各个阶段都是有顺序的,在项目中执行生命周期中指定的某个阶段,那么这个阶段前面的所有阶段都会执行,如执行 mvn package 打包时, 会先执行package前面的阶段validate、compile、test等,编译了源代码才能进行打包。
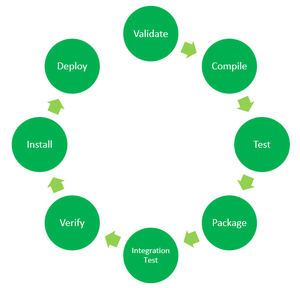
但是不同类型生命周期中的阶段原则上是没有先后顺序的,maven也不会自动关联这些阶段,需要明确指定。
mvn clean package
Maven将先执行clean生命周期中的clean阶段,再执行default生命周期的package阶段。
目标绑定关系
Maven作为核心程序,其实际是一个插件调度框架,所有任务都是通过插件来完成的。一个插件可以定义多个目标Goal(类似Ant中的Task任务),Maven支持将插件的目标绑定到不同生命周期的各个阶段上。
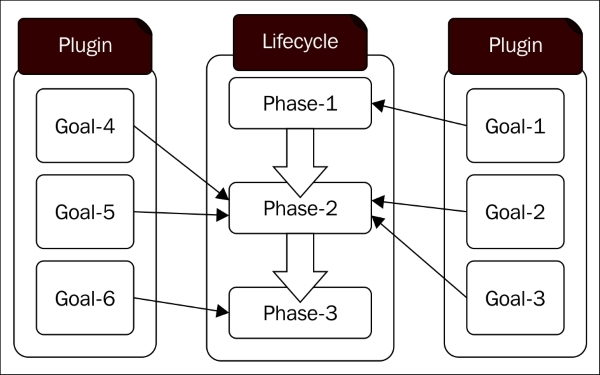
- 不同的目标可以绑定到相同的生命周期阶段
- 同一个目标也可以绑定到不同的生命周期阶段,只需定义
execution id即可,否则使用插件时会报must be unique错误
<plugin>
  <groupId>com.example.course</groupId>
  <artifactId>course-maven-plugin</artifactId>
  <version>1.0</version>
  <executions>
    <execution>
      <id>first-hello</id>
      <phase>compile</phase>
      <goals><goal>hello</goal></goals>
    </execution>
    <execution>
      <id>second-hello</id>
      <phase>package</phase>
      <goals><goal>hello</goal></goals>
    </execution>
  </executions>
</plugin>
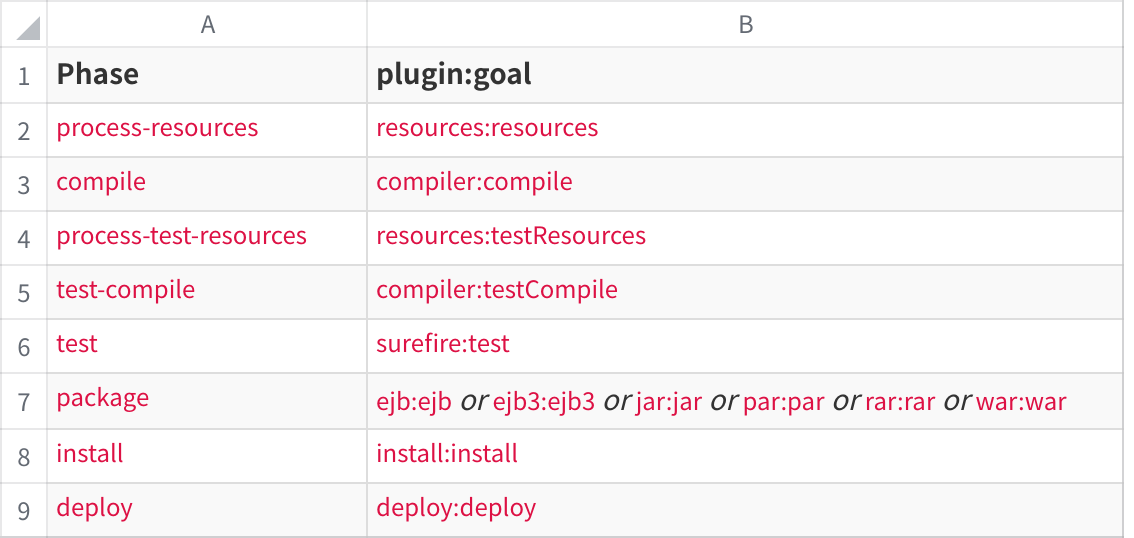
Maven的default生命周期中阶段非常多,但并不是所有的阶段都会执行,如果某个阶段上未绑定任何目标,那这个阶段相当于直接忽略。Maven提供了一些默认插件,根据项目类型会自动将插件目标绑定到生命周期的某些阶段上。
如下packaging为pom类型的项目时,通常是用来统一管理依赖,没有任何源代码,因此该项目构建过程 不会经历compile等阶段,而只有package、install、deploy。
<project xmlns="http://maven.apache.org/POM/4.0.0"
xmlns:xsi="http://www.w3.org/2001/XMLSchema-instance"
  xsi:schemaLocation="http://maven.apache.org/POM/4.0.0
http://maven.apache.org/xsd/maven-4.0.0.xsd">
  <modelVersion>4.0.0</modelVersion>
  <groupId>com.example.course</groupId>
  <artifactId>course-parent</artifactId>
  <version>1.0</version>
  <packaging>pom</packaging>
<project>
当构建类型为jar或者war项目时,目标通常被绑定到生命周期的这些阶段上
自定义目标绑定
编写一个简单的插件,在插件中定义一个目标,然后将插件打包安装到本地仓库,其它项目则引用这个插件,将其目标绑定到指定的生命周期阶段上。
开发插件
通过命令行以非交互模式快速创建一个mvn项目,maven官方插件命名规范是maven-xxx-plugin,而我们自定义的插件命名规范是xxx-maven-plugin。
$ mvn archetype:generate -DgroupId=com.example.course -DartifactId=course-maven-plugin
-Dversion=1.0 -DarchetypeArtifactId=maven-archetype-quickstart -DinteractiveMode=false
- 将项目导入idea,编译器相关版本设置Java8,编码设置为
UTF-8 - 开发maven插件,packaging必须设置为
maven-plugin
项目pom.xml如下
<project xmlns="http://maven.apache.org/POM/4.0.0" xmlns:xsi="http://www.w3.org/2001/XMLSchema-instance"
xsi:schemaLocation="http://maven.apache.org/POM/4.0.0 http://maven.apache.org/maven-v4_0_0.xsd">
  <modelVersion>4.0.0</modelVersion>
  <groupId>com.example.course</groupId>
  <artifactId>course-maven-plugin</artifactId>
  <packaging>maven-plugin</packaging>
  <version>1.0</version>
  <dependencies>
    <dependency>
      <groupId>junit</groupId>
      <artifactId>junit</artifactId>
      <version>4.12</version>
      <scope>test</scope>
    </dependency>
  </dependencies>
</project>
添加依赖
<dependency>
  <groupId>org.apache.maven</groupId>
  <artifactId>maven-plugin-api</artifactId>
  <version>3.0</version>
</dependency>
<dependency>
  <groupId>org.apache.maven.plugin-tools</groupId>
  <artifactId>maven-plugin-annotations</artifactId>
  <version>3.4</version>
  <scope>provided</scope>
</dependency>
在com.example.course包下创建类PrintlnHelloMojo,PrintlnHelloMojo继承AbstractMojo,通过注解
@Mojo定义了插件目标名为hello。
package com.example.course;

import org.apache.maven.plugin.AbstractMojo;
import org.apache.maven.plugins.annotations.Mojo;

@Mojo(name="hello")
public class PrintlnHelloMojo extends AbstractMojo {

    public void execute() {
        getLog().info("Hello, this is my custom plugin");
    }

}
通过命令mvn clean install将插件构建安装到本地仓库,com.example.course:course-maven-plugin:1.0就开发完成。
插件绑定到目标
通过如下非交互命令行再次创建一个maven项目,在这个项目中使用开发好的插件 course-maven-plugin 构建项目。
$ mvn archetype:generate -DgroupId=com.example.course -DartifactId=use-course-maven-plugin
-Dversion=1.0 -DarchetypeArtifactId=maven-archetype-quickstart -DinteractiveMode=false
项目pom如下
<?xml version="1.0" encoding="UTF-8"?>
<project xmlns="http://maven.apache.org/POM/4.0.0"
  xmlns:xsi="http://www.w3.org/2001/XMLSchema-instance"
  xsi:schemaLocation="http://maven.apache.org/POM/4.0.0 http://maven.apache.org/xsd/maven-4.0.0.xsd">
  <modelVersion>4.0.0</modelVersion>
  <groupId>com.example.train</groupId>
  <artifactId>use-course-maven-plugin</artifactId>
  <version>1.0-SNAPSHOT</version>
</project>
通过在pom.xml中自定义构建过程使用插件,将插件course-maven-plugin:1.0的目标hello绑定到生命周期的compile阶段。
<build>
  <plugins>
    <plugin>
      <groupId>com.example.course</groupId>
      <artifactId>course-maven-plugin</artifactId>
      <version>1.0</version>
      <executions>
        <execution>
          <phase>compile</phase>
          <goals>
            <goal>hello</goal>
          </goals>
        </execution>
      </executions>
    </plugin>
  </plugins>
</build>
编写完构建过程,在idea的右侧maven栏则可以看见自定义的course插件。
由于插件目标hello在定义时,并未绑定默认的生命的周期,如果此时不填写<phase>compile</phase>,那插件则不会运用到构建过程中。
执行如下任何一个命令验证,是否输出对应的日志。
# mvn course:hello
# mvn compile
D:\campus\workspace\use-course-maven-plugin>mvn course:hello
1327 [INFO] Scanning for projects...
1462 [INFO]
1462 [INFO] -------------------------------------------------------------------
1462 [INFO] Building use-course-maven-plugin 1.0-SNAPSHOT
1464 [INFO] -------------------------------------------------------------------
1469 [INFO]
1470 [INFO] --- course-maven-plugin:1.0:hello (default-cli) @ use-course-maven-plugin
1658 [INFO] Hello, this is my custom plugin
1659 [INFO] -------------------------------------------------------------------
1659 [INFO] BUILD SUCCESS
1659 [INFO] -------------------------------------------------------------------
插件接收参数
给目标传递参数主要有两种方式,首先需要通过@Parameter定义插件目标接收的参数。
@Mojo(name="hello")
public class PrintlnHelloMojo extends AbstractMojo {

    @Parameter(defaultValue = "${hello.author}", required = true)
    private String author;

    @Parameter(property = "description", required = true)
    private String description;

    public void execute() {
        getLog().info("Hello, this is my custom plugin, description: " +
            description + ", author: " + author);
    }
}
- 参数可以通过property方式接收,即
-Ddescription=xxx,也可通过系统属性接收参数值或者在项目pom.xml中进行配置 - required指定参数是否必须,如果强制需要,在项目构建时未传递相关参数则编译失败
在使用插件的构建过程中定义author参数
<build>
  <plugins>
    <plugin>
      <groupId>com.example.course</groupId>
      <artifactId>course-maven-plugin</artifactId>
      <version>1.0</version>
      <executions>
        <execution>
          <phase>compile</phase>
          <goals>
            <goal>hello</goal>
          </goals>
          <!-- 给插件传递author参数 -->
          <configuration>
            <author>example.com</author>
          </configuration>
        </execution>
      </executions>
    </plugin>
  </plugins>
</build>
通过-D系统属性给插件传递description参数
# mvn clean compile -Ddescription="测试插件动态参数"
...
2680 [INFO] --- course-maven-plugin:1.0:hello (default) @ use-course-maven-plugin
---
2777 [INFO] Hello, this is my custom plugin, description: 测试插件动态参数,
author: example.com
...
查看生命周期与目标
通过以下几种方式可以查看生命周期绑定或者目标
- 查看最终生效的pom
# mvn help:effective-pom
- 查看插件定义的目标
# mvn help:describe -Dplugin=course
[INFO] com.example.course:course-maven-plugin:1.0
Name: course-maven-plugin
Description: (no description available)
Group Id: com.example.course
Artifact Id: course-maven-plugin
Version: 1.0
Goal Prefix: course

This plugin has 1 goal:

course:hello
  Description: (no description available)
...
- 查看默认的生命周期全部阶段
# mvn help:describe -Dcmd=package
- 通过插件查看项目default生命周期各阶段绑定的目标
# mvn fr.jcgay.maven.plugins:buildplan-maven-plugin:list-phase
[INFO] Build Plan for container-group-console:
process-resources -----------------------------------------------------
+ maven-resources-plugin | default-resources | resources
compile ---------------------------------------------------------------
+ maven-compiler-plugin | default-compile | compile
+ `course-maven-plugin` | default | hello
process-test-resources ------------------------------------------------
+ maven-resources-plugin | default-testResources | testResources
test-compile ----------------------------------------------------------
+ maven-compiler-plugin | default-testCompile | testCompile
test ------------------------------------------------------------------
+ maven-surefire-plugin | default-test | test
package ---------------------------------------------------------------
+ maven-jar-plugin | default-jar | jar
+ spring-boot-maven-plugin | default | repackage
install ---------------------------------------------------------------
+ maven-install-plugin | default-install | install
deploy ----------------------------------------------------------------
+ maven-deploy-plugin | default-deploy | deploy
------------------------------------------------------------------------
扩展
编写一个插件构建Java项目zip包
要求:
- 插件生成的zip包路径位于项目根目录下的
target文件夹 - 插件必须基于maven生命中周期的compile阶段生成的target/classes才能完成工作
- zip文件中必须包含可执行的jar包,以及程序运行依赖的第三jar包lib目录
参考资料:
- https://docs.oracle.com/javase/tutorial/deployment/jar/appman.html
- https://maven.apache.org/plugin-tools/index.html
- Java编译运行基础
涉及的知识点:
- Java可执行Jar包的构建与运行(class加载机制)
- Maven插件编写、构建、绑定、打包等
- Java读写文件以及打包相关API,如ZipOutputStream、JarOutputStream、Manifest等
示例
假定现有如下项目use-plugin-demo,你的插件必须能按要求将如下示例项目进行打包,为了降低作业难度,不需要考虑依赖的传递,但需要考虑pom.xml中可能引入多个jar包 , 示例项目就引用了两个依赖包guava、collections,这个两个包不会传递其它任何包。
use-plugin-demo项目pom如下
<project xmlns="http://maven.apache.org/POM/4.0.0" xmlns:xsi="http://www.w3.org/2001/XMLSchema-instance"
  xsi:schemaLocation="http://maven.apache.org/POM/4.0.0 http://maven.apache.org/maven-v4_0_0.xsd">
  <modelVersion>4.0.0</modelVersion>

  <groupId>com.example.train</groupId>
  <artifactId>use-plugin-demo</artifactId>
  <packaging>jar</packaging>
  <version>1.0</version>

  <properties>
    <!-- maven compiler插件使用 -->
    <maven.compiler.source>1.8</maven.compiler.source>
    <maven.compiler.target>1.8</maven.compiler.target>
    <!-- 设定文件读写编码,maven resource处理插件使用 -->
    <project.build.sourceEncoding>UTF-8</project.build.sourceEncoding>
  </properties>

  <dependencies>
    <dependency>
      <groupId>com.google.guava</groupId>
      <artifactId>guava</artifactId>
      <version>18.0</version>
    </dependency>
    <dependency>
      <groupId>commons-collections</groupId>
      <artifactId>commons-collections</artifactId>
      <version>3.1</version>
    </dependency>
  </dependencies>
</project>
项目源代码结构
├─src
│  ├─main
│  │  └─java
│  │      └─com
│  │          └─example
│  │              └─train
│  │                  │  App.java
│  │                  │
│  │                  └─util
│  │                          ListUtil.java
│  │
│  └─test
│      └─java
│          └─com
│              └─example
│                  └─train
程序入口App main方法,main方法引用了com.example.train.util下的工具类ListUtil。
package com.example.train;

import com.example.train.util.ListUtil;

import java.util.List;

public class App {
    public static void main( String[] args ) {

        List<String> emptyList = ListUtil.getEmptyList();
        CollectionUtils.size(emptyList);
        System.out.println("OK");
    }
}
package com.example.train.util;

import com.google.common.collect.Lists;

import java.util.List;

public class ListUtil {

    public static List<String> getEmptyList() {
        return Lists.newArrayList();
    }
}
项目构建过程
<build>
  <plugins>
    <plugin>
      <groupId>com.example.train.plugins</groupId>
      <artifactId>bootJar-maven-plugin</artifactId>
      <version>1.0</version>
      <executions>
        <execution>
          <phase>package</phase>
          <goals>
            <goal>bootJar</goal>
          </goals>
        </execution>
      </executions>
    </plugin>
  </plugins>
</build>
执行命令构建打包
D:\campus\workspace\use-plugin-demo>mvn clean package -Dmain.class=com.example.train.App
最终在项目的target目录下生成了use-plugin-demo-1.0.zip文件
└─target
    │  use-plugin-demo-1.0.zip
    │
    ├─classes
    │  └─com
    │      └─example
    │          └─train
    │              │  App.class
    │              │
    │              └─util
    │                      ListUtil.class
解压use-plugin-demo-1.0.zip,文件目录结构如下
│  use-plugin-demo-1.0.jar
│
└─lib
        guava-18.0.jar
        commons-collections-3.1.jar
在zip解压后的目录下通过java -jar命令运行jar,能成功运行main方法,并输出日志
D:\campus\workspace\use-plugin-demo-1.0>java -jar use-plugin-demo-1.0.jar
OK
解压use-plugin-demo-1.0.jar文件内容格式如下
├─com
│  └─example
│      └─train
│          │  App.class
│          │
│          └─util
│                  ListUtil.class
│
└─META-INF
        MANIFEST.MF
参考答案
项目pom.xml
<project xmlns="http://maven.apache.org/POM/4.0.0" xmlns:xsi="http://www.w3.org/2001/XMLSchema-instance"
  xsi:schemaLocation="http://maven.apache.org/POM/4.0.0 http://maven.apache.org/maven-v4_0_0.xsd">
  <modelVersion>4.0.0</modelVersion>
  <groupId>com.example.train.plugins</groupId>
  <artifactId>bootJar-maven-plugin</artifactId>
  <packaging>maven-plugin</packaging>
  <version>1.0</version>

  <properties>
    <!-- maven compiler插件使用 -->
    <maven.compiler.source>1.8</maven.compiler.source>
    <maven.compiler.target>1.8</maven.compiler.target>
    <!-- 设定文件读写编码,maven resource处理插件使用 -->
    <project.build.sourceEncoding>UTF-8</project.build.sourceEncoding>
  </properties>

  <dependencies>
    <dependency>
      <groupId>org.apache.maven</groupId>
      <artifactId>maven-plugin-api</artifactId>
      <version>3.0</version>
    </dependency>
    <dependency>
      <groupId>org.apache.maven.plugin-tools</groupId>
      <artifactId>maven-plugin-annotations</artifactId>
      <version>3.4</version>
      <scope>provided</scope>
    </dependency>
    <dependency>
      <groupId>org.apache.maven</groupId>
      <artifactId>maven-core</artifactId>
      <version>3.1.1</version>
    </dependency>
  </dependencies>
  <build>
    <plugins>
      <plugin>
        <groupId>org.apache.maven.plugins</groupId>
        <artifactId>maven-plugin-plugin</artifactId>
        <version>3.5.2</version>
      </plugin>
    </plugins>
  </build>
</project>
插件核心类
@Mojo(name="bootJar")
public class BootJarMojo extends AbstractMojo {

    @Parameter(
            defaultValue = "${settings.localRepository}",
            required = true
    )
    private String localRepository;

    @Parameter(
            property = "main.class",
            required = true
    )
    private String mainClass;

    @Component
    protected MavenProject project;

    public void execute() throws MojoFailureException {
        getLog().info("project localRepository is " + localRepository);
        File baseDir = project.getBasedir();
        getLog().info("project base dir is " + baseDir);
        String artifactId = project.getArtifactId();
        String version = project.getVersion();
        File targetDirectory = new File(baseDir, "target");
        File classesDirectory = new File(targetDirectory, "classes");
        getLog().info("project classes dir is " + classesDirectory.getAbsolutePath());
        // get project dependency jars, ignore dependency transfer, only one demo
        List<File> dependencyFiles = project.getDependencyArtifacts()
                .stream()
                .map(Artifact::getFile)
                .filter(Objects::nonNull)
                .collect(Collectors.toList());
        // prepare manifest classpath
        String classpath = "";
        if (dependencyFiles.size() > 0) {
            classpath = dependencyFiles.stream().map(File::getName).map(e -> "lib/" + e).collect(Collectors.joining(" "));
        }
        getLog().info("classpath will be set as " + classpath);
        // create jar manifest
        Manifest manifest = createManifest(mainClass, classpath);
        getLog().info("manifest generated complete");
        String artifactName = artifactId + "-" + version;
        File bootJar = new File(targetDirectory, artifactName + ".jar");
        createJar(bootJar, manifest, classesDirectory);
        getLog().info(bootJar.getAbsolutePath() + " created successfully");
        File zip = new File(targetDirectory, artifactName + ".zip");
        createTargetZip(zip, bootJar, dependencyFiles);
        getLog().info(zip.getAbsolutePath() + " created successfully");
        // clear bootJar
        clearFile(bootJar);
        getLog().info("bootJar done");
    }

    /**
     * create the final zip file
     * @param zip zip file path
     * @param bootJar java jar
     * @param dependencyJars dependency jar lib
     */
    private void createTargetZip(File zip, File bootJar, List<File> dependencyJars) throws MojoFailureException {
        try (ZipOutputStream zos = new ZipOutputStream(new FileOutputStream(zip))) {
            boolean result = zip.createNewFile();
            getLog().info(zip.getAbsolutePath() + " created result: " + result);
            zos.putNextEntry(new ZipEntry(bootJar.getName()));
            writeFile(zos, bootJar);
            getLog().info(bootJar.getName() + " has been added to " + zip.getAbsolutePath());
            if (Objects.nonNull(dependencyJars) && dependencyJars.size() > 0) {
                for (File jar : dependencyJars) {
                    zos.putNextEntry(new ZipEntry("lib/" + jar.getName()));
                    writeFile(zos, jar);
                }
                getLog().info("copy dependency jars done");
            }
            zos.closeEntry();
            zos.flush();
        } catch (Exception e) {
            getLog().error(e);
            throw new MojoFailureException("create target zip error," + e.getMessage());
        }
    }

    /**
     * write file
     * @param os
     * @param file
     * @throws MojoFailureException
     */
    private void writeFile(OutputStream os, File file) throws Exception {
        try (FileInputStream fis = new FileInputStream(file)) {
            byte[] buf = new byte[1024];
            int len;
            while ((len = fis.read(buf)) != -1) {
                os.write(buf, 0, len);
            }
        } catch (Exception e) {
            getLog().error("write file error", e);
            throw e;
        }
    }

    /**
     * clear file or directory
     * @param file
     */
    private void clearFile(File file) {
        if (!file.exists()) {
            return;
        }
        if (file.isFile()) {
            if (!file.delete()) {
                getLog().warn("failed to delete file, " + file.getAbsolutePath());
            }
            return;
        }
        File[] files = file.listFiles();
        if (Objects.nonNull(files) && files.length > 0) {
            for (File f : files) {
                clearFile(f);
            }
        }
        if (!file.delete()) {
            getLog().warn("failed to delete dir, " + file.getAbsolutePath());
        }
    }

    /**
     * create jar file which can be executed by java -jar
     * @param bootJar target jar path
     * @param manifest
     * @param classesDirectory project class files
     * @throws MojoFailureException
     */
    private void createJar(File bootJar, Manifest manifest, File classesDirectory) throws MojoFailureException {
        try (JarOutputStream jos = new JarOutputStream(new FileOutputStream(bootJar), manifest)) {
            boolean result = bootJar.createNewFile();
            getLog().info(bootJar.getAbsolutePath() + " created result: " + result);
            addJarEntry(jos, classesDirectory, "");
            jos.closeEntry();
            jos.flush();
        } catch (Exception e) {
            getLog().error(e);
            throw new MojoFailureException("create bootJar error," + e.getMessage());
        }
    }

    /**
     *
     * @param jos
     * @param file
     * @param rootPath
     * @throws MojoFailureException
     */
    private void addJarEntry(JarOutputStream jos, File file, String rootPath) throws Exception {
        try {
            if (file.isDirectory()) {
                File[] files = file.listFiles();
                if (Objects.isNull(files) || files.length == 0) {
                    return;
                }
                // note: separator must be /, can't be //
                if (Objects.nonNull(rootPath) && rootPath.length() > 0) {
                    rootPath = rootPath + "/";
                }
                for (File f : files) {
                    addJarEntry(jos, f, rootPath + f.getName());
                }
            } else {
                jos.putNextEntry(new JarEntry(rootPath));
                writeFile(jos, file);
            }
        } catch (Exception e) {
            getLog().error(e);
            throw e;
        }
    }

    /**
     * copy maven repository jar to lib
     *
     * @param source
     * @param target
     * @throws MojoFailureException
     */
    private void copyFile(File source, File target) throws MojoFailureException {
        getLog().info("copy " + source.getAbsolutePath() + " to " + target.getAbsolutePath());
        try (FileInputStream fis = new FileInputStream(source);
             FileOutputStream fos = new FileOutputStream(target)) {
            byte[] buf = new byte[1024];
            int len;
            while ((len = fis.read(buf)) != -1) {
                fos.write(buf, 0, len);
            }
        } catch (Exception e) {
            getLog().error(e);
            throw new MojoFailureException("copy file error," + e.getMessage());
        }
    }

    /**
     * create jar manifest
     * @param mainClass
     * @param classPath
     * @return
     */
    private Manifest createManifest(String mainClass, String classPath) {
        Manifest manifest = new Manifest();
        manifest.getMainAttributes().putValue("Manifest-Version", "1.0");
        manifest.getMainAttributes().putValue("Created-By", "example");
        manifest.getMainAttributes().putValue("Main-Class", mainClass);
        if (Objects.nonNull(classPath) && classPath.length() > 0) {
            manifest.getMainAttributes().putValue("Class-Path", classPath);
        }
        return manifest;
    }
}